
Self Hosted VPN Server: Take Control of Your Privacy and Your Data
A self hosted VPN server is fundamentally different from a commercial VPN subscription. When you use a service like NordVPN or ExpressVPN, you are not gaining privacy — you are shifting trust from your ISP to a VPN provider you know even less about. A self hosted VPN server puts you back in control: your infrastructure, your rules, your data.
This article is for IT professionals, sysadmins, privacy-conscious individuals and organizations that want to understand the technical and strategic case for running their own VPN server — and how CacheGuard makes it possible without enterprise complexity or cost.
If you are primarily motivated by cost savings rather than control and privacy, read our dedicated article on building a free VPN server at home with CacheGuard.
What Is a Self Hosted VPN Server?
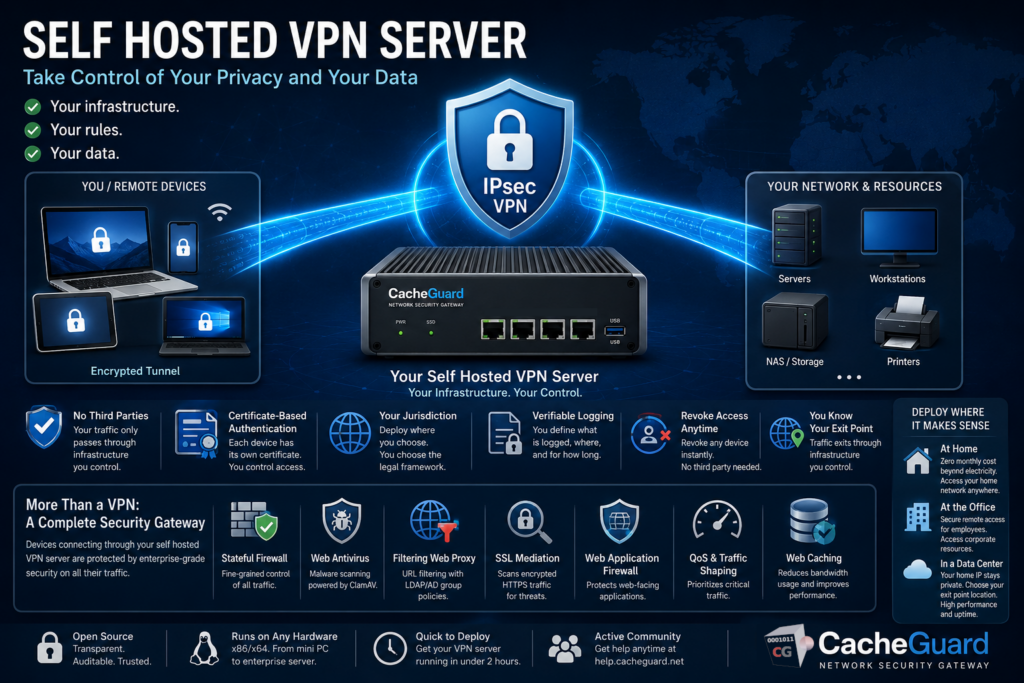
A self hosted VPN server is a VPN endpoint that runs on infrastructure you own and control — a physical machine at home or in an office, a virtual machine in your own hypervisor, or a rented server in a data center. Unlike a commercial VPN service where your traffic passes through a third party’s servers, a self hosted VPN server means your traffic only ever passes through infrastructure you have chosen and configured yourself.
This distinction matters for several reasons that commercial VPN providers rarely acknowledge openly.
Why Self Hosting a VPN Server Gives You Real Privacy
The privacy argument for commercial VPN services is based on a claim: “we do not log your traffic.” This is a promise you have no way to verify. The VPN provider’s servers, their jurisdiction, their business model and their relationship with law enforcement are all factors outside your control.
A self hosted VPN server changes this equation entirely:
You define the logging policy. You decide what is logged, where logs are stored and how long they are kept. No third party makes these decisions for you.
You control the infrastructure. Your VPN endpoint runs on hardware or a virtual machine you have chosen. You know what software runs on it, what version it is, and who has access to it.
You choose the jurisdiction. Whether you deploy at home, in a corporate data center or on a rented server, you choose the country and legal framework that governs your data. You are not subject to the jurisdiction of a VPN provider’s home country.
You manage authentication. With a self hosted VPN server using CacheGuard, authentication is certificate-based. Each device has its own unique certificate that you generate and control. You can revoke access for any device at any time without depending on a third party.
You know your exit point. With a commercial VPN, your traffic exits through the provider’s infrastructure. With a self hosted VPN server, it exits through infrastructure you control — whether that is your home network, your office or a rented server.
Self Hosted VPN Server vs Commercial VPN: The Honest Comparison
| Commercial VPN | Self Hosted VPN Server | |
|---|---|---|
| Who sees your traffic | ✅ VPN provider | ✅ Your ISP (same as without VPN) |
| Logging policy verifiable | ❌ No | ✅ Yes — you define it |
| Infrastructure control | ❌ No | ✅ Full control |
| Authentication control | ❌ No | ✅ Full control |
| Jurisdiction | ⚠️ Provider’s choice | ✅ Your choice |
| Access to home network | ❌ No | ✅ Yes |
| Appear to be in another country | ✅ Yes | ⚠️ Only if deployed in a data center |
| Cost | ⚠️ €5 to €15 per month | ✅ Electricity only (self-hosted) or server rental |
| Setup complexity | ✅ None | ⚠️ Moderate — 2 to 4 hours |
| Dependency on third party | ⚠️High | ✅ None |
The one area where commercial VPNs genuinely win is geographic flexibility — if you need to appear to be in a specific country for content access, a commercial VPN with servers worldwide is the easier option. A self hosted VPN server’s exit point is fixed to wherever you deploy it.
Deployment Options for a Self Hosted VPN Server
One of the most important decisions when setting up a self hosted VPN server is where to deploy it. Each option has different privacy, performance and cost implications.
Home Deployment
Deploy CacheGuard on a dedicated machine at home — a fanless mini PC, a repurposed laptop or a small server. Your VPN traffic exits through your home internet connection.
Advantages: Zero ongoing server cost beyond electricity, full physical control of the hardware, access to your home network from anywhere.
Considerations: Your home IP address is visible as the VPN exit point. If your ISP assigns a dynamic IP, you need DynDNS (CacheGuard includes built-in DynDNS support). Your VPN performance is limited by your home internet upload speed.
Office or Corporate Deployment
Deploy CacheGuard as a gateway appliance in your office or data center. Remote employees connect to the office network securely through the VPN tunnel.
Advantages: Access to corporate resources from anywhere, encrypted remote access for all employees, consistent security policy across all remote connections.
Considerations: Requires a machine with at least two network interfaces and a stable internet connection at the office.
Data Center or Cloud Deployment
Deploy CacheGuard on a rented virtual machine in a data center. Your VPN traffic exits through the data center’s IP address rather than your home or office IP.
Advantages: Your home IP is not exposed, the exit point IP can be in a country of your choice, high bandwidth and uptime guarantees.
Considerations: Monthly server rental cost (typically €5 to €20 per month depending on provider and specifications), traffic still visible to the server provider. ⚠️ Public cloud providers typically charge based on bandwidth consumption.
Technical Architecture of a Self Hosted VPN Server with CacheGuard
CacheGuard implements IPsec VPN using the ESP (Encapsulating Security Payload) protocol in tunnel mode — the most secure configuration for VPN deployments. It is powered by StrongSwan, one of the most widely deployed and trusted open-source IPsec implementations.
To better understand IPsec, please read our article on What is IPsec?
IPsec in Tunnel Mode
In tunnel mode, the entire original IP packet — header and payload — is encrypted and encapsulated in a new IP packet. This means that not only is the content of your traffic protected, but also the original source and destination IP addresses are hidden from anyone observing the tunnel.
Certificate-Based Authentication
CacheGuard uses certificate-based authentication as well as pre-shared keys. Certificate-based authentication is the more secure approach for several reasons:
- Each device has its own unique certificate — compromise of one device does not affect others
- Certificates can be revoked individually without changing the VPN configuration for other devices
- There is no shared secret to distribute or protect
- CacheGuard includes an integrated mini PKI that generates and manages the root CA, server certificate and client certificates from a single interface
Client Support
CacheGuard generates ready-to-use client configuration profiles for:
- iOS and macOS — native IPsec client
- Android — StrongSwan app
- Windows — native IPsec client
- Linux — StrongSwan
No third-party VPN client software needs to be installed on most devices — the operating system’s built-in IPsec support is sufficient.
What CacheGuard Adds Beyond a Pure VPN Server
A self hosted VPN server built on CacheGuard is not just a VPN endpoint. It is a complete network security gateway that happens to include a VPN server. This is a significant differentiator from tools like WireGuard or OpenVPN which are VPN-only solutions.
When your devices connect through a CacheGuard self hosted VPN server, all their traffic is also protected by:
- Stateful firewall — fine-grained control over all traffic to and from your network
- Web antivirus — gateway-level malware scanning powered by ClamAV
- Filtering web proxy — URL filtering with LDAP/AD group-based policies
- SSL inspection — called SSL mediation in CacheGuard — scans encrypted HTTPS traffic for threats
- Web Application Firewall — protects web-facing applications from attacks
- QoS and traffic shaping — prioritizes critical traffic across your connection
- Web caching — reduces bandwidth consumption for frequently accessed content
This means that devices connecting through your self hosted VPN server benefit from enterprise-grade security scanning on all their traffic — something no commercial VPN service provides.
Setting Up Your Self Hosted VPN Server with CacheGuard
Here is a high-level overview of the deployment process:
Step 1 — Choose your deployment location. Home, office or data center — refer to the deployment options section above to choose the right approach for your needs.
Step 2 — Prepare your hardware or VM. Any x86/x64 machine with at least two network interfaces. Minimum 512 MB RAM and 20 GB disk for a basic deployment. A fanless mini PC is ideal for a home deployment.
Step 3 — Download and install CacheGuard-OS. Download the free ISO from cacheguard.com, boot from it and follow the installer. The OS installs itself and configures the system automatically based on available hardware.
Step 4 — Configure network interfaces. Connect CacheGuard between your internet connection and your internal network. Configure the external and internal interfaces through the web interface.
Step 5 — Configure port forwarding. Forward UDP ports 500 and 4500 on your router to your CacheGuard appliance to allow IPsec VPN traffic through.
Step 6 — Set up DynDNS (if needed). If your internet connection uses a dynamic IP, configure DynDNS using a free service like freemyip.com. CacheGuard updates the DNS record automatically when your IP changes.
Step 7 — Generate certificates. Use CacheGuard’s integrated mini PKI to generate a root CA, a VPN server certificate and individual client certificates for each device or user.
Step 8 — Enable the VPN server. Activate IPsec VPN in CacheGuard’s function modes and apply the configuration.
Step 9 — Generate and distribute client profiles. CacheGuard generates ready-to-use configuration files for each client device. Distribute them securely to your users.
Step 10 — Connect and verify. Import the client profile on your device, activate the VPN and verify connectivity. Your self hosted VPN server is operational.
For the complete step-by-step technical guide, refer to our detailed tutorial: How to Build Your Own VPN Server at Home with CacheGuard
Self Hosted VPN Server: PSK vs Certificate Authentication
CacheGuard supports both certificate-based authentication and pre-shared key (PSK) authentication for its self hosted VPN server. Here is when to use each:
Certificate-based authentication is recommended for most deployments. Each device gets its own certificate, access can be revoked per device, and there is no shared secret to protect. This is the most secure and most scalable approach.
PSK authentication is simpler to configure and suitable for small deployments where certificate management overhead is not justified — for example a single user connecting a small number of trusted devices.
Conclusion
A self hosted VPN server is not just a cheaper alternative to commercial VPN services — it is a fundamentally different approach to privacy and network security. It gives you control over your infrastructure, your authentication, your logging policy and your exit point. For organizations and individuals who take data sovereignty seriously, it is the only approach that actually delivers what commercial VPNs only promise.
CacheGuard makes deploying a self hosted VPN server accessible to anyone with basic networking knowledge — combining enterprise-grade IPsec VPN with a complete network security stack, free and open source, on any hardware you already own.
Want to know more? Read our Free VPN Server: Build Your Own With CacheGuard article and visit our Firewall and VPN solution page. Download CacheGuard for free and have your self hosted VPN server running in under two hours. Questions about deploying CacheGuard? Visit the community forum at help.cacheguard.net or browse the full documentation at CacheGuard Documentation.