
Homelab Firewall: Platform vs Integrated Appliance
Choosing a homelab firewall is one of the first real infrastructure decisions in any home lab setup. It sits at the boundary between your network and the internet, controls what traffic flows in and out, segments your lab networks from each other, and forms the foundation that every other security decision builds on. Get it right and the rest of the lab is easier to secure. Get it wrong and you spend months fighting configuration issues that the right tool would have avoided entirely.
The homelab community converges quickly on two names: pfSense and OPNsense. Both are excellent. Both are also built on a specific architectural philosophy — the platform model — that is right for some homelab goals and wrong for others. This guide explains the difference honestly, covers what each approach delivers, and presents a third option that is underrepresented in homelab discussions despite being the most practical choice for a significant subset of homelab users.
What You Actually Need From a Security Gateway
Before choosing software, it helps to be clear about what you are actually asking your homelab firewall to do. The list varies significantly between users.
At the minimum, a homelab firewall provides stateful packet filtering — allowing or denying traffic flows based on source, destination, port, and protocol. It handles NAT between your private lab networks and the public internet. It provides DHCP and DNS for your lab segments. It gives you a web interface so you are not managing rules through a command line. Almost every option on the market covers this baseline adequately.
The more interesting requirements are the ones that separate basic firewalls from full UTM appliances: network segmentation into multiple isolated zones, VPN server for remote access and site-to-site tunnels, web proxy with URL filtering and content inspection, gateway antivirus scanning web traffic before it reaches any device, SSL inspection for encrypted traffic, Web Application Firewall for any self-hosted web services, and traffic shaping for bandwidth management across lab segments.
How many of these you need — and how quickly you need them working — largely determines which homelab firewall architecture is right for you.
The Platform Approach: pfSense and OPNsense
pfSense and OPNsense are the dominant homelab firewall platforms. Both are BSD-based. Both provide an excellent core firewall and routing engine. Both extend toward UTM functionality through a plugin and package ecosystem. And both have large, active communities that produce documentation, tutorials, and forum support in abundance.
The platform philosophy is deliberately modular: a solid core with independently managed extensions. This gives you precise control over every component. You choose which proxy engine to use, which IDS/IPS ruleset to apply, which antivirus integration to configure. You can tune each component independently and update them on your own schedule.
The homelab firewall case for pfSense and OPNsense
If your homelab goal is learning — specifically, learning how enterprise network security components work by configuring them yourself — pfSense and OPNsense are the right choice. Installing Squid as a proxy, wiring it to ClamAV via c-icap, configuring ssl-bump for HTTPS inspection, and tuning Suricata rules teaches you how each component works at a level that a pre-integrated solution cannot. The configuration effort is the point.
Both platforms also offer deeper per-component configurability than any integrated appliance. Advanced routing scenarios, custom traffic engineering, BGP, OSPF, complex VLAN configurations — the platform model handles these because the underlying OS and its tools are directly accessible. For homelabbers running sophisticated multi-site or enterprise-simulation setups, this flexibility is genuinely necessary.
The homelab firewall case against them
The platform model’s strength is also its operational cost. Reaching a complete UTM feature set — working web proxy, working antivirus integration, working SSL inspection, working WAF — requires assembling and maintaining multiple independently versioned components. Each update cycle carries the risk of inter-component compatibility issues. The time investment to maintain this stack is real and ongoing.
For homelabbers whose primary interest is not network security configuration — who want a secure network as a foundation for other lab work, not as the lab work itself — this maintenance overhead is friction that the platform model does not reduce over time. Our detailed comparison of pfSense alternatives and OPNsense alternatives covers these trade-offs in depth.
The Integrated Appliance Approach: Complete UTM From Day One
The alternative philosophy ships every security component pre-integrated in a single OS image. There is no plugin ecosystem to manage, no inter-component compatibility surface, no version coordination between a proxy engine, an antivirus daemon, and a WAF module. Every feature is part of the same codebase, tested against every other feature before each release, and configured through a single interface.
For a homelab firewall, this approach trades per-component configurability for operational simplicity. The full UTM feature set is available from day one — not after assembling and debugging a stack of plugins. The maintenance burden is a single-system update rather than coordinated updates across multiple independently versioned components.
This is particularly relevant for homelabbers who want to learn about network security concepts — zone-based firewall architecture, gateway antivirus, URL filtering, SSL inspection, VPN, WAF — without spending their lab time on plugin compatibility debugging. The integrated appliance lets the features work so you can study how they work, rather than spending time making them work.
Hardware Requirements for a Homelab Firewall
Regardless of which software approach you choose, the hardware requirements for a homelab firewall are consistent: any x86 or x64 machine with at least two network interfaces. One interface connects to your internet uplink (WAN); the other connects to your lab switch (LAN). Additional interfaces or VLAN-capable NICs support multiple isolated lab segments.
For a homelab handling typical traffic volumes — a few dozen devices, home internet speeds, moderate web filtering — the hardware requirements are modest. A small fanless mini PC with an Intel N100 or equivalent processor, 4GB of RAM, and a small SSD is more than adequate. Repurposed enterprise hardware — an old desktop or a second-hand server — works equally well.
Running Your Homelab Firewall as a Virtual Machine
Many homelabbers run their firewall as a VM on Proxmox, VMware ESXi, or another hypervisor rather than on dedicated hardware. This works well for both the platform and integrated appliance approaches, with one important consideration: the VM needs dedicated physical NIC passthrough or a properly configured virtual network to handle WAN and LAN separation. A firewall VM sharing a physical NIC with other VMs on the same bridge is not effectively separating network segments.
For homelab use cases focused on learning network security concepts — rather than production security — a VM-based homelab firewall on a hypervisor with virtual networks is entirely appropriate. The security concepts, zone architecture, filtering rules, and VPN configuration are identical to a bare-metal deployment. The practical difference is that a VM-based firewall does not protect physical devices on your home network with the same rigor as a properly deployed perimeter appliance.
CacheGuard as a Homelab Firewall: The Integrated Option
For homelabbers who want a complete UTM security stack available from day one — without the plugin assembly and maintenance overhead of the platform model — CacheGuard is a free, open-source integrated network security appliance that warrants consideration.

CacheGuard-OS is a custom Linux distribution built from scratch specifically as a security appliance, with active development since 2002. It ships with a complete UTM feature set pre-integrated: zone-based stateful firewall with built-in DoS protection, web proxy with URL filtering, gateway antivirus, SSL inspection, Web Application Firewall powered by ModSecurity and the OWASP Core Rule Set, IPsec VPN with IKEv2 based on StrongSwan, reverse proxy with load balancer, QoS with HTB and SFQ, and web caching. All configured through a single browser-based interface.
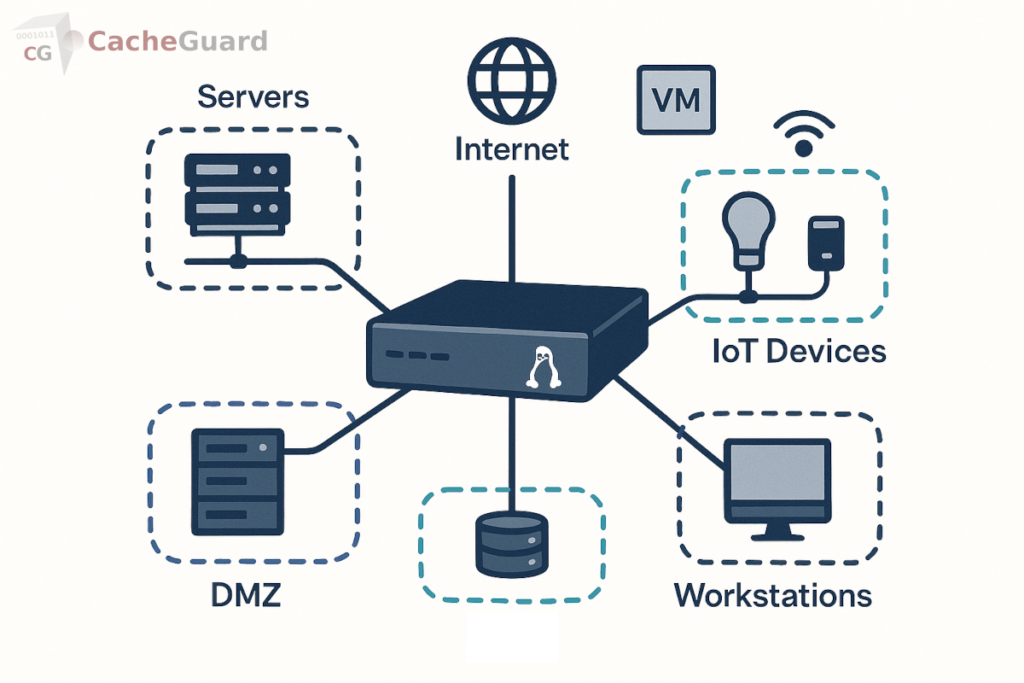
For homelab use cases, it installs on any x86 machine or VM and is functional as a complete security gateway in under an hour. The zone architecture supports dedicated segments for lab servers, IoT devices, trusted workstations, VPN clients, and a DMZ for self-hosted services exposed to the internet — exactly the segmentation model that most homelab security setups require. Our guide to securing IoT devices on your network covers how zone isolation applies in practice.
What CacheGuard does not offer is the deep per-component configurability of pfSense or OPNsense. There is no plugin ecosystem. You cannot substitute individual components or tune the underlying BSD network stack at a granular level. For homelabbers whose goal is learning network engineering at that depth, the platform model remains the right choice. For homelabbers who want a working security foundation to build the rest of their lab on, the integrated approach removes a significant amount of friction.
Platform or Integrated Appliance: How to Decide
The honest decision comes down to what your homelab is for.
- Choose pfSense or OPNsense if your primary goal is learning network engineering — configuring components, understanding how they interact, building skills in BSD-based network administration, and running complex multi-site or enterprise-simulation topologies. The platform model is the right tool for this goal and the community support is exceptional.
- Choose an integrated appliance like CacheGuard if you want a complete, working security stack as a foundation for other lab work — Kubernetes clusters, self-hosted services, development environments, IoT experimentation — and you do not want to spend your lab time on proxy-to-antivirus integration debugging. The integrated model gets the security layer working so you can focus on what the security layer is protecting.
Both are free. Both run on the same commodity hardware. Both are legitimate homelab firewall choices for different homelab goals. The mistake to avoid is choosing pfSense or OPNsense by default simply because they are the most discussed options — without asking whether the platform philosophy matches what you are actually trying to do with your lab.
You can download CacheGuard for free from the official website. It installs from a single ISO image and is configured through a browser-based web interface.
Want to go deeper? Read our guide to UTM appliances for a complete overview of the integrated security stack, our pfSense comparison and OPNsense comparison for detailed feature breakdowns, or download CacheGuard for free and have it running in your homelab today.
Questions about deploying CacheGuard? Visit the community forum at help.cacheguard.net or browse the full documentation at CacheGuard Documentation.